Imagine your PC wont boot, or you can't use it because of a hard drive failure, a nasty virus, ransomware, malware or a failed Windows Update. Now what will you do? Without a recent Image Backup, you have no other options than to: Re-install Windows. Then find and install all your Programs. Remember and change all your settings. Find and install your "restore software", and hope that you have a recent back up. Now restore and hope it works. Trust me, this could take many hours or days. It is almost certain your system will not be exactly the way it was! (According to Gartner Group, over 50% of users still never get "all their stuff back", after decades and hundreds of "backup" companies' offerings.)
so you can easily restore your system to a brand new or existing hard drive.
No external hard drive? Visit our External Hard Drives page for recommendations
SnapBack Uses Native Built-in Microsoft Windows 7, 8 and 10 Image Backup Technology.
So you can be assured that it will be fully compliant with all Windows support requirements, which includes the ability to mount any of these images as a VM (Virtual Machine). The most important part of recovery is actually having backups. Restoring can be complicated, but if you have a backup you can always get help recovering!
Image Backup Recovery
Have no fear, SnapBack has your back!
Everyone should Make a "USB Recovery Drive" today...
This can be made on Windows 8 and 10 at any time so make one before you need it! -- This only takes about 10 minutes, usually costs under $20, and can save you a lot of grief if you're traveling. Order one of these Small Keychain USB Drives today from Amazon, and carry it with you. Minimum requirement for the USB drive is at least 16GB, so it's a good idea to get at least a 32GB one. All data on the USB will be deleted when you make it into a Recovery Drive. After creating it, you can carry critical personal copies of your files on that USB drive as well*.
*NOTE: This USB flash drive should NOT be where your backups are stored. (The USB Recovery Drive is created with a "FAT32" partition, and is not nearly as reliable as it would be if it were an "NTFS" Partition.) Power Tip: If you have a large enough USB drive, and you'd like to also store other critical files, reduce the first partition, and create a second NTFS partition to store any important files.
How to Make a "USB Recovery Drive or Repair Disc":
Windows 7 (Repair Disc - CD/DVD): go to Control Panel, Backup and Restore, and on the left side, choose "Create a System Repair Disc".
Windows 8 & 10 (Recovery Drive - USB): hit the Windows Key and type in "Create a Recovery Drive" and click on it.
Windows 10 (Repair Disc - CD/DVD): If you don't want to use a USB drive, hit the Windows Key and type in "Backup and Restore" and click on "Backup and Restore (Windows 7)". In the new window, click on "Create a system repair disc" on the left.
(Coming soon: One-click button to initiate making a Recovery Drive/Repair Disc.)
Ready to Recover Using your Image Backups?
Restoring your Image Backup often makes the most sense, but not always...
Consider alternatives, or actions you should take before hitting that restore button. Failing hardware, corrupted operating or file system, or lost access to many of your files or folders can cause a PC to fail to start. Some of these problems won't become immediately apparent. However, most often you can recover, if you know what to do and what not to do.
"Windows Reset" has often resulted in PCs that are unable to boot...
Users have been following OEMs advice to use "Windows Reset from within Windows or from within Recovery Console, with or without the option of keeping "user files or programs". (Later, we'll provide links to likely causes). So, if you have a choice of using a recent Image Backup, NEVER trust ANY "Fix my Drive" options, even if it is a Windows utility. If you do try "Windows Reset", at least make an Image Backup first, if possible.
How to Restore:
GET HELP if you aren't an expert --If you are not experienced, or are unsure, it's a great idea to get experts to help before you restore, they can help with anything from hardware replacement to an Image Backup restore. Live Expert help is available in most US cities from a satisfaction guaranteed Amazon tech. If you are the tech, use the following advice, or send us your recovery tips so we can share them here to help others:
First, REPLACE your physical drive if possible, and set the original drive aside.
Don't restore an Image Backup to a drive with problems, unless you have little choice...
Even if the drive hardware itself is still perfect, you might be missing or have lost access to a large number of files. If they've been gone for a while, before your earliest Image Backup, restoring an Image won't contain what you wanted. Restoring over your existing drive may overwrite parts of your drive that still contain your data that could have been used to recover. For instance, your missing folders may exist inside the snapshots that SnapBack is taking several times a day. If so, restoring an Image Backup to your existing hard drive will remove any ability to recover these files from a snapshot, since none of the snapshots are backed up inside an "Image Backup". Also, there are a number of tools to recover files from your hard after they have been deleted.
Snapshots can only be used to recover any files or folders from different points in time. But snapshots can only exist on and with the original hard drive, from which each snapshot was taken at those different points in time. Also, snapshots are NOT backed up by most Image Backup software, (unless using relatively rare sector by sector image backups). So you can't use snapshots as the source from which to restore a hard drive. (Snapshots only contain pieces of the changed data, and mostly rely on the source's raw hard drive data to produce a mountable image of that snapshot.)
Most drives can be replaced, or a spare drive provided for less than $100. Shop here to get a replacement drive from Amazon. (Get one or two day delivery with Amazon Prime!)
Then...
Here's How you can Quickly Restore:
Image Recovery can be simple if you hard drive is good and you just want to rollback time: Boot your system into "Recovery Console", connect your external Backup Drive, initiate restoring one of your Windows Image Backups, go for coffee and come back in an hour or so and your system will be exactly like it was before the disaster!
Boot into the Recovery Console:
If your Drive C: is still good, you can enter the Recovery Console from the login screen, click on the power icon, hold shift and click on "Restart". You can also enter the Recovery Console from inside Windows, open the Settings app, select Update & security, select Recovery, and click “Restart now” under Advanced startup.
Otherwise boot using your "USB Recovery Drive/Repair Disc". (If your Drive C: is still present, your BIOS might not allow you to boot from USB/CD-ROM, a guide will be provided here in the future, please Google it for now, since it may vary by PC manufacturer)
Image Backup Restore Step by Step Procedure:
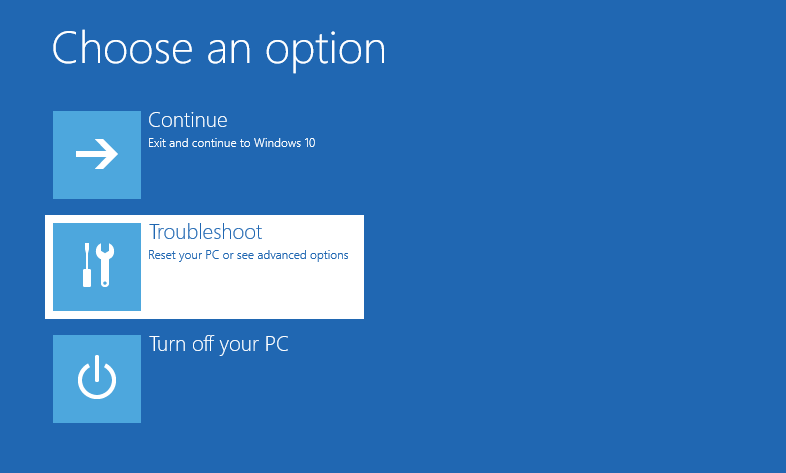
Recovery Console Opening Screen Choose "Troubleshoot"
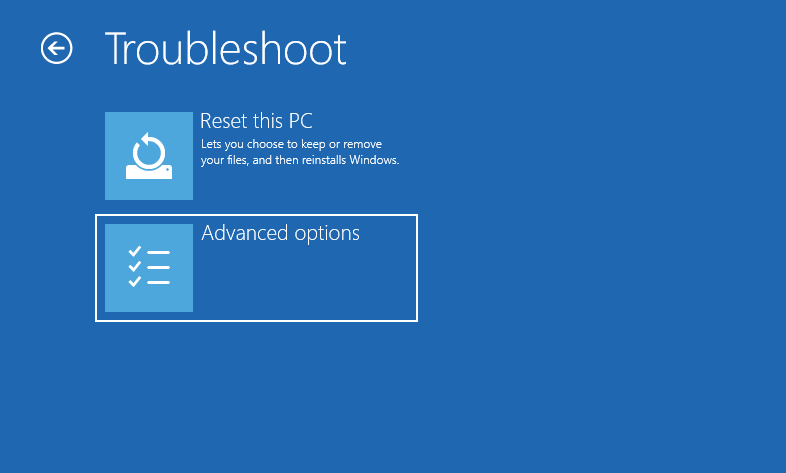
Choose "Advanced Options" Never Choose Reset this PC
Choose "System Image Recovery"
NEVER Choose "System Restore" or "Startup Repair" if you have a recent Image Backup that you can restore! --- (Although these sometimes work, don't EVER make these choices, unless forced to.) This could brick your PC! If you do try these, then do a complete new Image Backup before you try it, so you can try other actions after restoring that image, if it fails.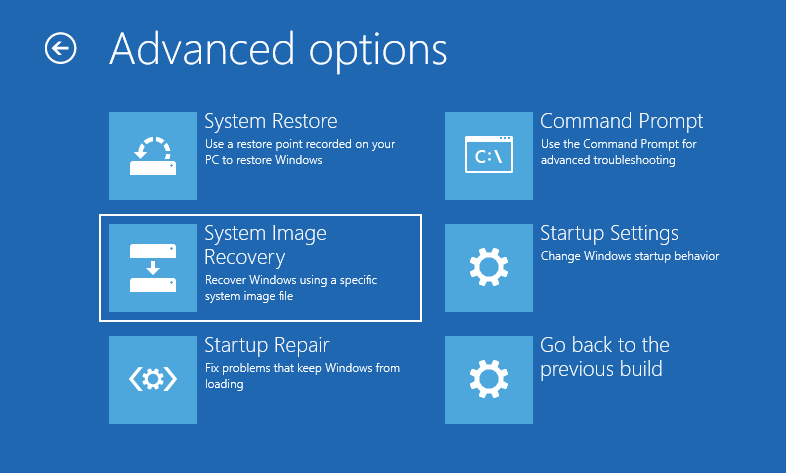
System Preparations Screen

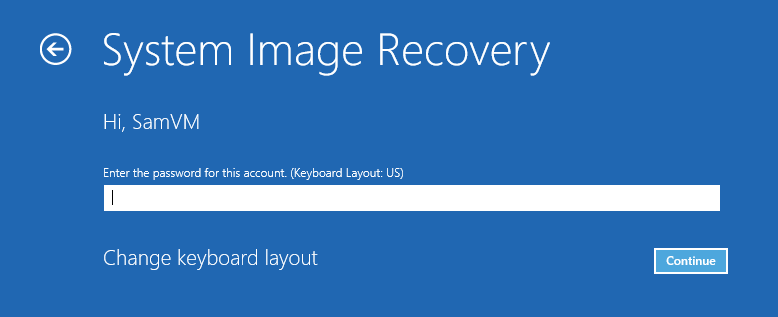
Choose an Account

Enter Account Password
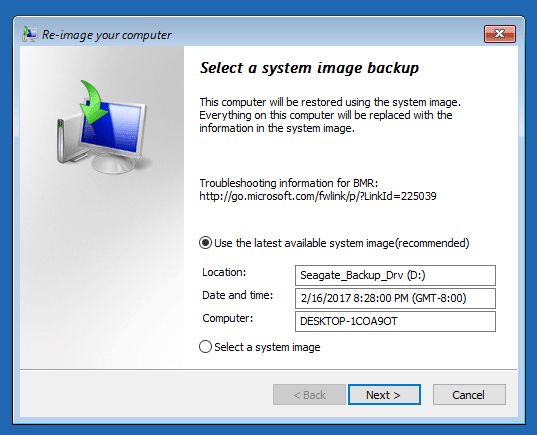
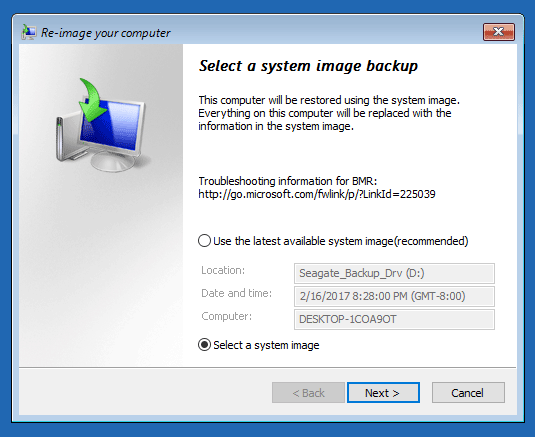
Select a System Image backup to restore
IF the drive shown is where your Image Backups are stored. IMPORTANT: To see the choices, you MUST click on the, "Select a System Image" button, and then choose NEXT. Snapback is designed to take, store and keep more than one Image Backup version that you can choose to restore. Windows was not designed to normally deal with multiple Image Backups. So by default, this screen only shows the one most recent Image Backup. Therefore, this screen below will NOT show you the filename, and instead, only shows the date that THIS Image Backup will use as the source to restore from.
To see all images click on "Select a System image"
List of Available Images
All available images are listed when your external drive is connected. Choose the Image Backup you'd like to restore from. If SnapBack performed the backup, after that backup is complete, SnapBack renames that folder. If your computer name was Daves-PC, SnapBack renames it to: Daves-PC_2-26-2017_105gb. So, all the Image Backups will show which PC, when the backup was done, and how large it was. "Advanced" also allows you to choose a shared Windows network location from which to restore. (Network Image Backup restores might take a VERY long time. So, make sure you can't connect that Image Backup directly from that physical drive or through a USB-3 cable to the source containing that backup, (instead of a shared Windows network drive.)
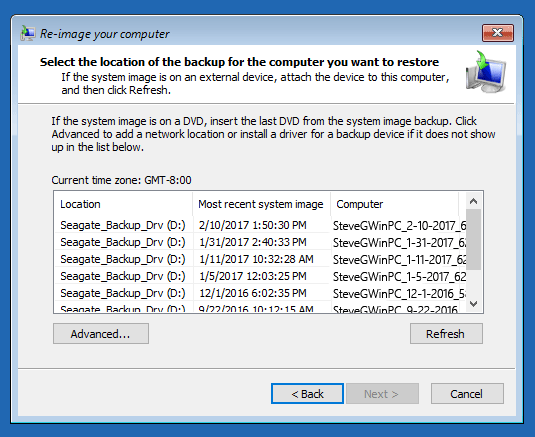
Pick an image to restore
You will see ALL Windows image backups that are on your external drive inside the \WindowsImageBackup\ folder. However, you will not be able to restore any images that were made from dissimilar hardware. To restore these Drive Images, you must use Recovery Console on a PC that is similar hardware that was used to create that Image Backup.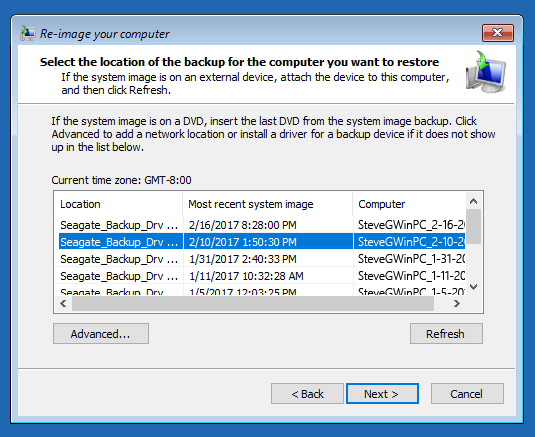
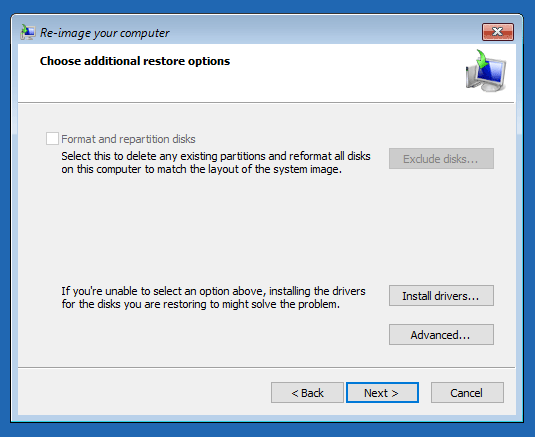
Additional Restore Options
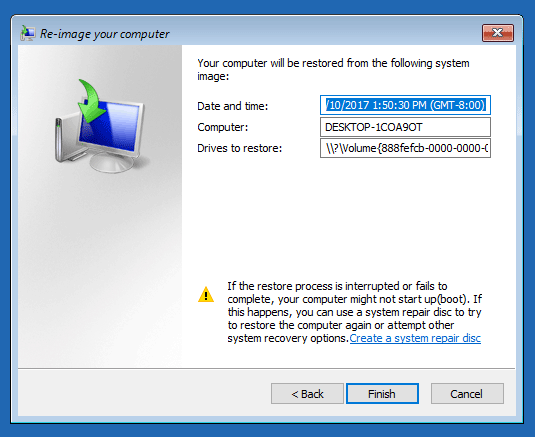
Restore Confirmation
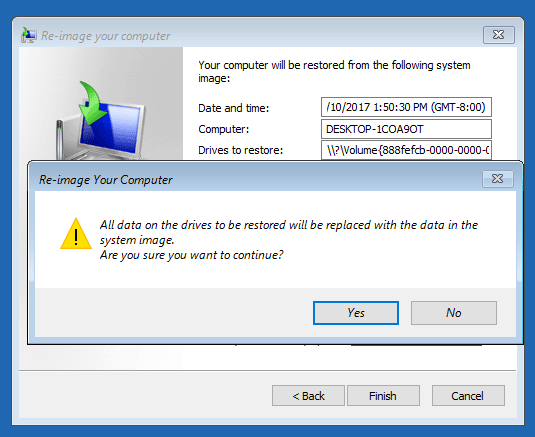
Restore Warning
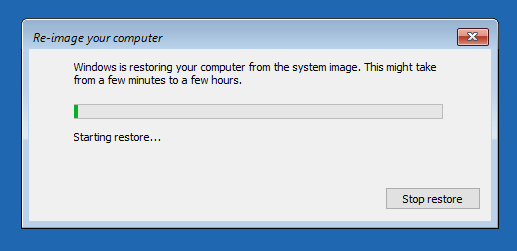
Restore Progress
When restoring an Image Backup to an SSD drive, it may take considerably longer than it did to create that Image Backup.